 You can say a lot of things about this image–it is blurry, it is too dark, it manifests the starry night problem, etc., etc. Still, it is our first image out of the bean sorter cam connected to a Raspberry Pi. I am going to do some infrastructure stuff to be able to pull stuff down easily from the embedded computer, but I will be moving on to work on the lights Gene sent me within a few days. Of course those days extend out quite a bit because I have a day job. Nevertheless, one has to take their satisfaction when they can get it and this is satisfaction any engineer might understand.
Category: Software Page 2 of 5
Today was a good day at work. It all had to do with sorting and measuring spuds on a conveyor, but that is a story for when we see each other face to face. The other reason it is a good day is the image below. I spoke prematurely when I said I had everything ready to go with the bean sorting development environment for the Raspberry Pi. I was wrong. It turns out the stuff I had on my development computer was incompatible with the stuff on the Raspberry Pi and it took me until about 15 minutes ago to get it all sorted out. Hopefully, I have a shot at getting the camera going on the RPi and maybe even getting started in on controlling the lights we need for the project with the RPi. Another fun filled weekend!
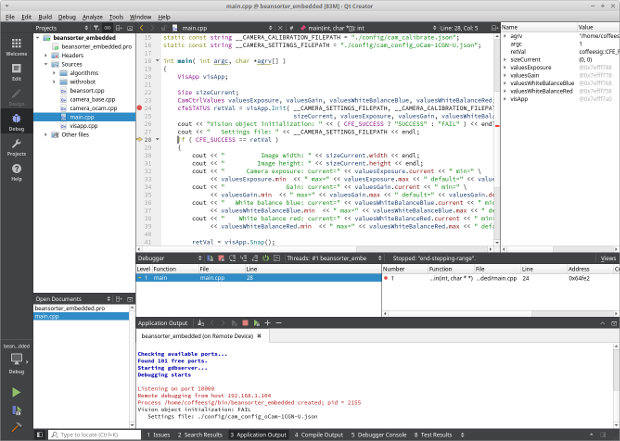
A couple more hours and remote debug is up and running. Develop on my desktop, deploy and debug over wifi to the Raspberry Pi. It took about 14 hours all told, but it was interesting and all worth the investment. Now it is on to getting the camera working on the RPi.
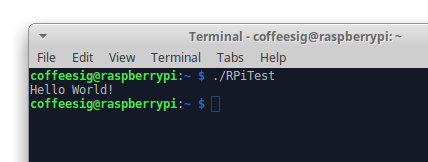 I got up to my office about 7:00 AM this morning and have been programming steadily since then. Well, I call it programming. Really what I was doing was trying to figure out how to get Raspberry Pi programs I write and build on my laptop (that I use as a desktop) to cross compile with Qt Creator so they will run on the Raspberry Pi which is what we started with on our coffee bean sorting project because it is cheap and we are cheap. I finally got it all to work about 12 hours later. I am wildly happy to have the bulk of this out of the way. Now I can bet back to thinking about coffee beans. Now the program I compiled previously on the Raspberry Pi should be fundamentally easier to debug.
The one good part about all this is that when I am programming I am generally not eating and the time flies. I did a pretty good job of staying on my diet.
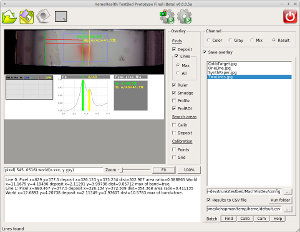
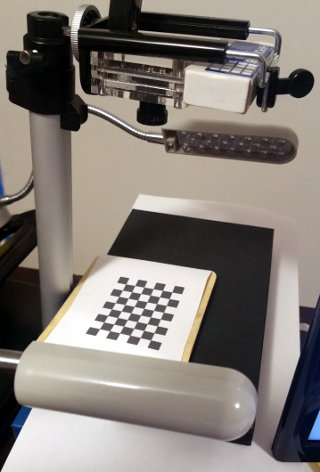 Yesterday, I spent my spare time on creating a camera calibration for our bean sorter project. The purpose of the calibration is to convert measurements of beans in captured images from pixel units to mm units. Images are made up of pixels, so when measurements are performed we know how big things are in terms of pixels. Something might be 20 pixels wide and 17.7 pixels high (subpixel calculations is a topic for another day). Knowing the width of something in an image is pretty worthless because the real world width ( e.g. in millimeters) of that object will vary greatly based on magnification, camera angle and a bunch of other stuff. That is a big problem if the camera moves around a lot.
Fortunately, in our case, the camera will be in a fixed location and the distance to the falling beans will always be the same. That allows us to make some fixed calculations to convert pixel units to millimeters. To that end, we put a “calibration target” in the cameras field of view at the  position where through which the beans will fall. In our case that calibration target is a checkerboard pattern with squares of a known size. If we take a picture of the checkerboard pattern, then find the location of each square in the image in pixels, and store that information away.
Notice the red marks at each intersection of squares in the checkerboard–those are the found pixel positions (e.g. 133.73 pixels from the top of the image and 214.5 pixels from the left edge of the image). We can then convert the positions and sizes of found beans in the image from pixel units to mm units by using equations derived from the know mm sizes of the squares and the found position of the squares in the image as measured in pixel units. I used to have to hand write the equations to do this, but now there are open source libraries for this, so I was able to do the whole thing in an evening.
 Gene and I continue to make progress on our bean inspection project. Here is the first pass at measuring bean size as beans drop past the camera. This includes finding the bean in the image, calculating its contour and measuring how big it is in the image. The next step is to convert the bean size in the image measured in pixel units to the size in millimeters. I am half way into that.
The other thing I did this weekend was load up a Raspberry Pi with the latest Raspbian OS and got it running on the network. Right now, I am doing all my work on my Linux PC, but the idea is to move it over to the Raspberry Pi as soon as it is a little further up the development path because that is a much cheaper computer. There are some other options that might be even better (cheaper and faster), but I have a Raspberry Pi, so that is where we will start.
Gene is not sitting still either. He has built me up some prototype lighting, but I will save that for a post of its own.
 I bought a global shutter camera from Ameridroid for Gene’s and my new project. It is a pretty amazing little camera, especially for the price. It is a USB 3.0 so it runs fast. I do not have the lens I need for the application we are doing so I ordered a three lens kit (need it anyway). I hope to be able to start testing beans falling past the camera before the end of the holiday, but that might be a little ambitious.
The other really good thing about this camera compared to the ov5640 cameras I have been using is that the Korean company, WithRobot, that makes the camera provides great, freely available libraries to control all the things the camera does. If I can get the camera control into our proto-type program, we will have made a major step in getting to the point where we can actually start developing a product.
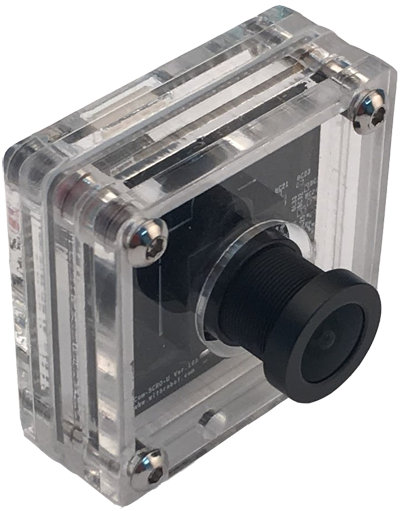 Yesterday I bought a machine vision camera for the project my buddy Gene and I are doing to build a (semi-)cheap little machine to inspect coffee beans. We need something called a global shutter camera because the beans will be in motion when we capture their images. In the past a camera like this would have cost in the $1000 range. Over the years they dropped to $300-$400. Yesterday, I paid $135 for this camera–quantity 1–and that included shipping. If this is coupled with a Raspberry Pi and OpenCV (~$200 with a power supply, heat sink, and other necessary stuff), it is possible to build a vision system that is faster (by a lot) and smarter (by a lot) than the vision systems we used to sell when I started at Intelledex in 1983 for $30k (~$74k in today’s dollars). The upshot is that it is now possible to do tasks for cheap that no one would have ever thought possible. There are large categories of machine vision problems that companies are accustomed to paying through the nose to solve. That is truly not necessary anymore if one is smart enough to put the pieces together. I hope we are smart enough.
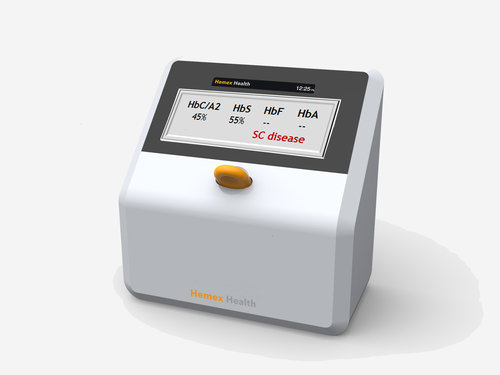
 Some good news and some good news arrived yesterday. The first is that my participation in the sickle cell disease diagnostic project is wrapping up. I will still be on call for the machine vision elements of the project, but I will not be tasked with the day to day programming any longer. The second is a good friend (Gene C.) I have known since I was a child has agreed to work with me on a side project. We are going to make a “cheap but good” coffee bean inspection machine. There are lots of machines that do that, but none of them are particularly cheap in the way we want our machine to be cheap. We hope to do this for another friend who lives in Dallas.
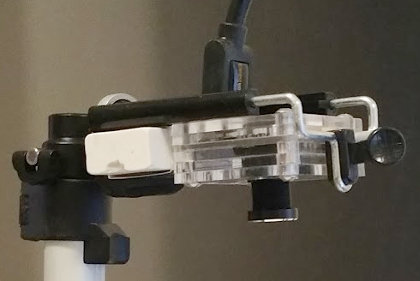
 I bought two lights I plan to use for the project. One of them is a back light and one of them is a ring light. I am pretty sure we will not be able to use these in our finished instrument, but they will certainly help me with development of lighting and optics. I still need to buy (at least) a few m12 mount lenses and a cheap USB microscope. I already have a camera with the wrong lens, but it has allowed me to start writing the program I will use to do image processing and classification algorithm development. I got it to take pictures before I went to bed last night.
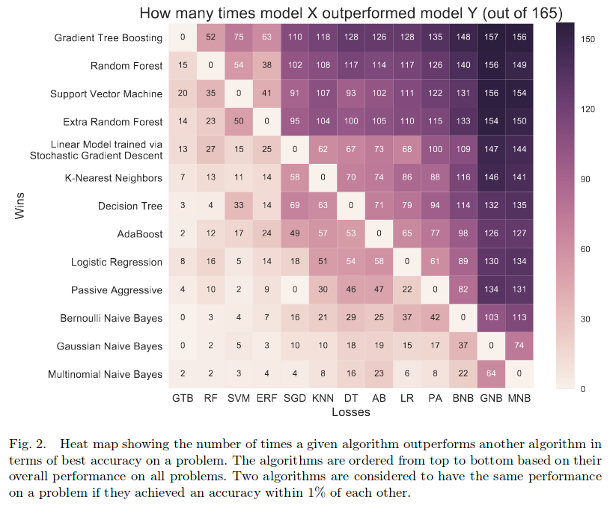
My buddy (the brilliant) Andrew B. posted the following image on his Twitter feed along with a link to the article from which it came. Those who work in this arena will understand. I get angsty about whether I have chosen the right model. Most of the time, it turns out that, if I did not chose the best one, I got pretty close. Thanks Andrew.
 I have installed a program named Mattermost on my home server. I have been using it for a couple of weeks and it is very powerful. In my previous job, we used a similar program named Slack that we used extensively. Both of these are super-capable chat clients. I figured out how to do task lists in Mattermost. This is a life saver for a lot of the stuff I am doing.
I like Mattermost best because it is free at the low level I need, easy to use, I can run it on my home server, and it does everything I want it to do.
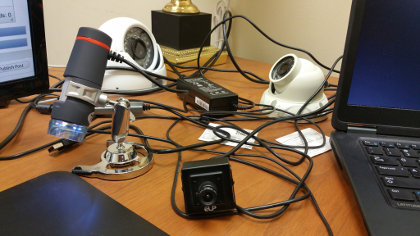 I will have one more work week in Texas after today. I enjoy my job and the people where I work a lot and it was agonizing to turn in my notice. Part of the job I love the most is the requirement to create sophisticated machine vision and video analytics applications with cheap USB cameras and ARM embedded computers that run embedded Linux, usually Debian. We prototype a lot of the stuff on Raspberry Pi’s which is great because there is such a big user community it is easy to quickly get answers about just about anything. There are four cameras in the article accompanying this post that range in value between $20 and $50.
All of the cameras work just fine right out of the box for the purpose for which they were design–that is generally streaming video with camera controlling the capture gain and offset. Conversely, it reduces the repeatability and precision of most machine vision application if the offset, gain and lighting controls are not managed by the application. So, it has been part of my job to dive into the driver code far enough to figure out how to set the registers that need to be set to control cheap cameras well enough to work in accord with the stringent requirements of many machine vision applications. That takes a lot of patience and, although it is not exactly rocket science, it is very rewarding when the last piece of minutiae is chased down and the stuffs starts working.
One thing I have learned is that this “big data” thing is here to stay, at least in my world of machine vision, embedded computing and video analytics. There are tons of things you can almost do deterministically that become tractable when enough data and machine learning are thrown at them. I am loving working with Weka and R and the machine learning functionality in the OpenCV library because they open up new vistas, not to mention I can more frequently say, “I think I can do that” and not squint my eyes and wonder whether I am lying.
 I got up early and walked to work where I spent several hours figuring out the technology we have available on our project will not allow us to do what we want to do. Lorena and I had a late breakfast and I walked back to the apartment to work on the sickle cell diagnosis project for CWRU. We are at the point where we need to start testing our system in the field to be continue to receive grant money. That means I am on a strict time schedule with a fairly continuous stream of small, but important short term deliveries. It is a little bit of a challenge right now with my day job, the house purchase and the move, but all I have to do is survive for three months of this and I actually might have done something good for humanity–Africa and India in particular. Of course, lots of people have the skills to do this kind of thing, so I am grateful to get the chance to do it.
That in addition to having lots of technical help from Kiwi.
 This weekend, I put the final touches on the prototype/demo version of the sickle cell disease software I am developing for Case Western Reserve University and HemexHealth. It will be demonstrated to potential partners in this week. I am not sure how much longer I will be needed for this project other than some tweaks to make it work better and easier to use, but it has been one of the most gratifying projects on which I have ever worked. It has huge potential to do good. I hope I get the opportunity to do more projects like this again in my lifetime.
 Down 7.4 of 60
After things started to settle down a little in our lives since the funeral, I had been trying to figure out what to do next. The folks were gone and the kids are on their own and are way too low maintenance for our taste (still going through withdrawal from their going off to college three years ago). Fortunately, I was recently selected to help a group of researchers at Case Western Reserve University and a company named HemexHealth develop a product with an incredible social mission. I really do not know much about how it all works (after all, I type for a living), but the product is designed to rapidly and inexpensively diagnosis sickle cell disease. I DO know how to do my part of the product and am thankful for the opportunity to contribute to such a noble endeavor.
It is going to be a ton of work, but this is exactly the type of project I love. If this is not a good hobby project, I do not know what is. The other thing it will do is take up enough time that maybe Lorena will fill some modicum of guilt about browbeating me into exercising so much. “It’s for a good cause honey and you know I program better with a belly full of biscuits and gravy!”
 Kiwi continues to help me with my work on the Gaugecam project. We all recevied an email yesterday describing some of the new information that will appear in the next refereed journal article. Some of it will have an impact on my work–we will know what to do to make the system even more accurate under changing conditions. It is slow work since I have so much other stuff going, but my hope is that I can turn this into my retirement project. I hope to have a demo of some of the stuff we are doing to put up here within the next few months.
I had an irritating problem doing a simple image conversion for my GaugeCam project where I am capturing images with a USB camera that I want to process with OpenCV on a Beaglebone Black embedded computer. I am using a Logitech C270 camera for my development work on the desktop, but we will be using a different, more industrial quality camera when we get ready to put the devices we are building in the field. At any rate, I usually can just do an Internet search and find some code I can cut and paste to do this simply types of conversions so I though I would just put this out there in case anyone wants to use it. If you have questions on how to use it with OpenCV, just ask. Feel free to just cut and paste as needed–use at your own risk, it works in my application.This is not a tutorial, just a convenience for whoever can use it. I know the format is not great–I will get around to adding something to the blog for code pasting if I ever do any more of it.
A couple of additional notes:
- I am converting this to BGR (for OpenCV) rather than the RGB specified in Wikipedia.
- I am using the boost::algorithm::clamp method to do the clamping (using namespace boost::algorithm). You can do clamping with something like this if you like: MIN( 255, MAX( 0, x ) )
- You might have to convert “u_char” to “unsigned char” depending on what other includes you use.
- I am assuming the stride of both the source and destination buffers are equal to the width.
- I am assuming the output buffer has been allocated.
- I am assuming the input buffer is a YUYV buffer that is two-thirds the size of the output buffer in the format specified in the Wikipedia link.
- The way I am using this is passing the cv::Mat data pointer into the method as the output buffer.
// ~~~~~~~~~~~~~~~~~~~~~~~~~~~~~~~~~~~~~~~~~~~~~~~~~~~~~~~~~~~~~~~~
// Conversion algorithm from: https://en.wikipedia.org/wiki/YUV
// ~~~~~~~~~~~~~~~~~~~~~~~~~~~~~~~~~~~~~~~~~~~~~~~~~~~~~~~~~~~~~~~~
int ConvertYUYV_2_BGR( const int nWidth, const int nHeight,
u_char *pPixSrc, u_char *pPixDst )
{
if ( NULL == pPixSrc || NULL == pPixDst )
{
cerr << “FAIL: Cannot convert YUYV to BGR from/to NULL pixel buffers” << endl;
return -1;
}
int nStrideSrc = nWidth * 2;
int nStrideDst = nWidth * 3;
u_char *pSrc = pPixSrc;
u_char *pDst = pPixDst;
int nRow, nCol, nColDst, c, d, e;
for ( nRow = 0; nRow < nHeight; ++nRow )
{
for ( nCol = 0, nColDst = 0; nCol < nStrideSrc; nCol +=4, nColDst += 6 )
{
d = ( int )pSrc[ nCol + 1 ] – 128; // d = u – 128;
e = ( int )pSrc[ nCol + 3 ] – 128; // e = v – 128;
// c = y’ – 16 (for first pixel)
c = 298 * ( ( int )pSrc[ nCol ] – 16 );
// B – Blue
pDst[ nColDst ] = ( u_char )clamp( ( c + 516 * d + 128 ) >> 8, 0, 255 );
// G -Green
pDst[ nColDst + 1 ] = ( u_char )clamp( ( c – 100 * d – 208 * e + 128 ) >> 8, 0, 255 );
// R – Red
pDst[ nColDst + 2 ] = ( u_char )clamp( ( c + 409 * e + 128 ) >> 8, 0, 255 );
// c = y’ – 16 (for second pixel)
c = 298 * ( ( int )pSrc[ nCol + 2 ] – 16 );
// B – Blue
pDst[ nColDst + 3 ] = ( u_char )clamp( ( c + 516 * d + 128 ) >> 8, 0, 255 );
// G -Green
pDst[ nColDst + 4 ] = ( u_char )clamp( ( c – 100 * d – 208 * e + 128 ) >> 8, 0, 255 );
// R – Red
pDst[ nColDst + 5 ] = ( u_char )clamp( ( c + 409 * e + 128 ) >> 8, 0, 255 );
}
pSrc += nStrideSrc;
pDst += nStrideDst;
}
return 0;
}
My work to develop a camera with a web interface for GaugeCam is progressing nicely. Right now, I am just working on GUI kinds of things. I have live images and snapshots from the camera working and have moved on to a good little chunk of work to get region-of-interest selection and ruler tool setup working on the web as it worked in the original software. Sadly, the hard drive on my computer at home went bad so I am fighting through that for a little while.
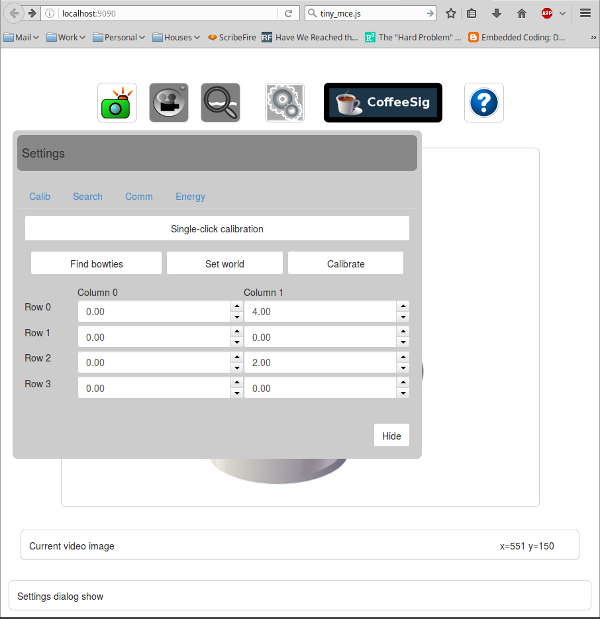
I got my we GaugeCam development site, http://gaugecam-dev.duckdns.org/, that I run from my home office on the BBB up and going again. You can see it here. It is pretty rudimentary right now, but I will start moving the new GaugeCam software there as I get it written. I am, again, putting up a list of the things I did to get there for my own self so I can duplicate it again and when I get to the next project. This post is going to be a list of links to a couple of videos and the stellar duckdns site that provides free dynamic DNS services for hobby and volunteer projects like this. So here is the list that got me up and running:
- Beaglebone Black (HD) – Wired Internet Connection through the Ethernet Port There is another tutorial by the same guy that demonstrates how to do this wirelessly, too.
- Beaglebone Black – Web Server Tutorial There are a couple of additional links in the video to how to great little tutorials on how to start from ground zero and setup up your Beaglebone Black.
- DuckDNS Free dynamic DNS service with instructions on how to set up the service and links to how to set up your router to get to the outside world.
The purpose of this video is to show the status of my work on an application to process live video in real time from a webcam (or other camera) using OpenCV and the Wt libraries. I will try to get this up and running live on the Internet from my BeagleBone Black in the next few days.